With the last post getting a little long, we will pick up where we left off. Our first task is to setup something called a proxy volume. A proxy volume is a portworx specific feature that allows me to create a PVC that is backed by an external NFS share, in this case my minio export. It should be noted that I wiped the minio configuration from the export by deleting the .minio.sys directory, but you won’t need to worry about that with a new install.
kind: StorageClass
apiVersion: storage.k8s.io/v1
metadata:
  name: portworx-proxy-volume-miniok8s
provisioner: kubernetes.io/portworx-volume
parameters:
  proxy_endpoint: "nfs://10.0.1.8"
  proxy_nfs_exportpath: "/volume1/miniok8s"
  mount_options: "vers=3.0"
allowVolumeExpansion: true
---
kind: PersistentVolumeClaim
apiVersion: v1
metadata:
  namespace: minio
  name: minio-data
  labels:
    app: nginx
spec:
  storageClassName: portworx-proxy-volume-miniok8s
  accessModes:
    - ReadWriteMany
  resources:
    requests:
      storage: 2T
The above does a couple of things. First, note the ‘—‘ This is a way of combining yaml files into one file. The first section creates a new storage class that points to my nfs export. The second section creates a PVC called minio-data that we will use later. Why not just mount the nfs export to the worker node? Because I don’t know which worker node my pod will be deployed on, and I would rather not mount my minio export to every node (as well as needing to update fstab anytime I do something like this!)
Apply the manifest with:
kubectl apply -f minio-pvc.yaml
Install Minio
To install minio, we will be using helm again. We will be using a values.yaml file for the first time. Let’s get ready:
kubectl create namespace minio
helm  show values minio/minio > minio-values.yaml
The second command will write an example values file to minio-values.yaml. Take the time to read through the file, but I will show you some important lines:
32 mode: standalone
...
81 rootUser: "minioadmin"
82 rootPassword: "AwsomeSecurePassword"
...
137 persistence:
138   enabled: true
139   annotations: {}

  ## A manually managed Persistent Volume and Claim
  ## Requires persistence.enabled: true
  ## If defined, PVC must be created manually before volume will be bound
144   existingClaim: "minio-data"
...
316 users:
322   - accessKey: pxbackup
323     secretKey: MyAwesomeKey
324     policy: readwrite
Be careful copying the above as I am manually writing in the line numbers so you can find them in your values file. It is also possible to create buckets from here. There is a ton of customization that can happen with a values.yaml file, without you needing to paw through manifests. Install minio with:
helm -n minio install minio minio/minio -f minio-values.yaml
Minio should be up and running, but we don’t have a good way of getting to it. Now is the time for all of our prep work to come together. We first need to plumb a couple of networking things out.
First, configure your firewall to allow port 80 and 443 to point to the IP of any node of your cluster
Second, configure a couple of DNS entries. I use:
minio.ccrow.org – the s3 API endpoint – This should be pointed to the external IP of your router
minioconsole.lab.local – my internal DNS name to manage minio. Point this to any node in your cluster
Now for our first ingress:
kind: Ingress
apiVersion: networking.k8s.io/v1
metadata:
  name: ingress-minio
  namespace: minio
  annotations:
    cert-manager.io/cluster-issuer: letsencrypt-prod
    kubernetes.io/ingress.class: nginx
    nginx.ingress.kubernetes.io/proxy-body-size: "0"
    nginx.ingress.kubernetes.io/proxy-read-timeout: "600"
    nginx.ingress.kubernetes.io/proxy-send-timeout: "600"
spec:
  tls:
    - hosts:
        - minio.ccrow.org
      secretName: minio-tls
  rules:
    - host: minio.ccrow.org #change this to your DNS name
      http:
        paths:
          - path: /
            pathType: Prefix
            backend:
              service:
                name: minio
                port:
                  number: 9000
---
kind: Ingress
apiVersion: networking.k8s.io/v1
metadata:
  name: ingress-minioconsole
  namespace: minio
  annotations:
    cert-manager.io/cluster-issuer: selfsigned-cluster-issuer
    kubernetes.io/ingress.class: nginx

spec:
  tls:
    - hosts:
        - minioconsole.lab.local
      secretName: minioconsole-tls
  rules:
    - host: minioconsole.lab.local # change this to your DNS name
      http:
        paths:
          - path: /
            pathType: Prefix
            backend:
              service:
                name: minio-console
                port:
                  number: 9001
The above will create 2 ingresses in the minio namespace. One to point minioconsole.lab.local to the minio-console service that the helm chart created. The second to point minio.ccrow.org to the minio service.
We haven’t talked much about services, but they are a way for containers running on kubernetes to talk to each other. An ingress listens for an incoming hostname (think old webservers with virtual hosts) and routes to the appropriate service, but because of all of the work we have done before, these ingresses will automatically get certificates from let’s encrypt. Apply the above with:
kubectl apply -f minio-ingress.yaml
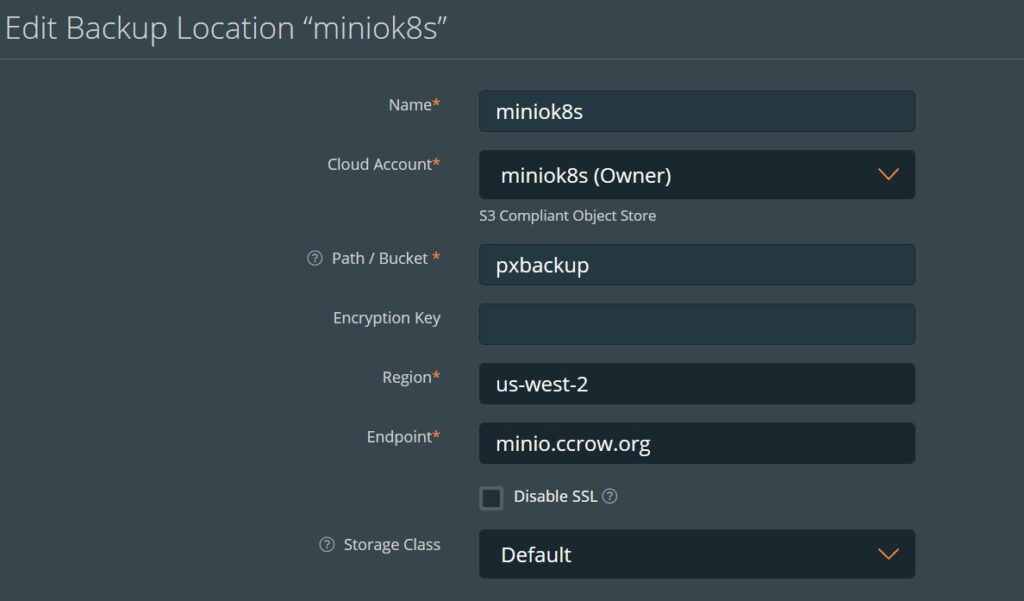
There are a few things that can go wrong here, and I will update this post when questions come in. At this point, it is easy to configure PX backup from the GUI to point at minio.ccrow.org:
And point PX Backup at your cluster:
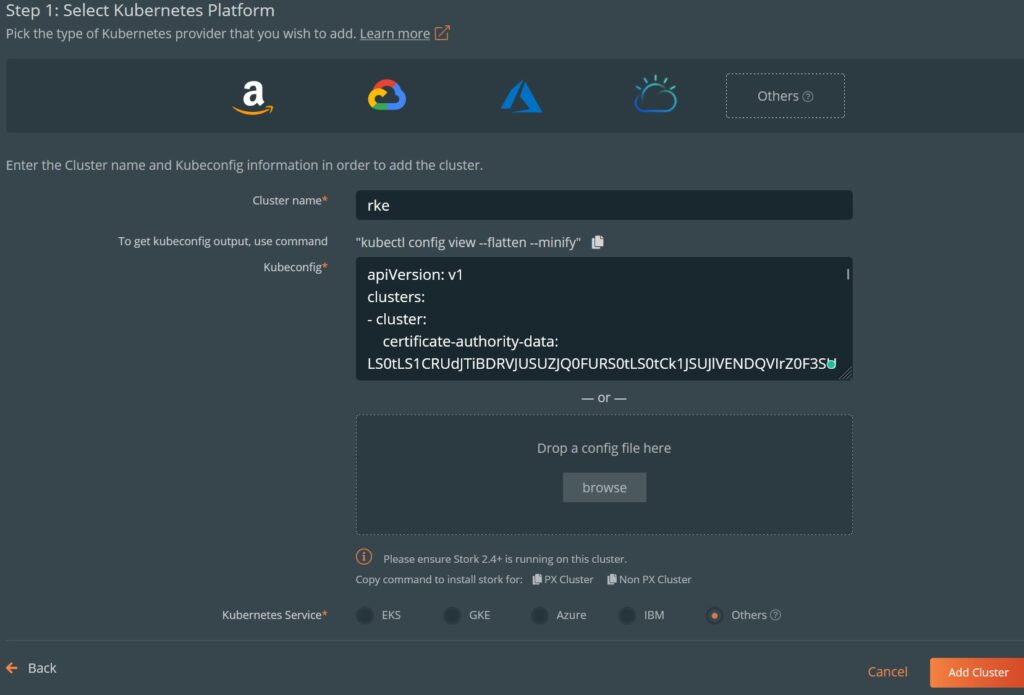
You can export your kubeconfig with the command above.
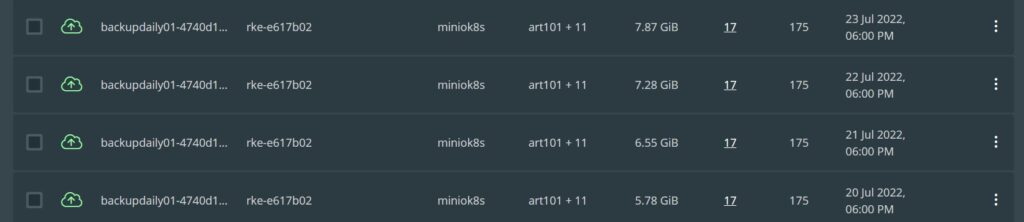
We have to click on the ‘All backups’ link (which will take a few minutes to scan), but:
Again, sorry for the cliff notes version of these installs, but I wanted to make sure I documented this!
And yes, I backed up this WordPress site this time…