The rest of the restore – part 2

With the last post getting a little long, we will pick up where we left off. Our first task is to setup something called a proxy volume. A proxy volume is a portworx specific feature that allows me to create a PVC that is backed by an external NFS share, in this case my minio export. It should be noted that I wiped the minio configuration from the export by deleting the .minio.sys directory, but you won’t need to worry about that with a new install.

kind: StorageClass
apiVersion: storage.k8s.io/v1
metadata:
  name: portworx-proxy-volume-miniok8s
provisioner: kubernetes.io/portworx-volume
parameters:
  proxy_endpoint: "nfs://10.0.1.8"
  proxy_nfs_exportpath: "/volume1/miniok8s"
  mount_options: "vers=3.0"
allowVolumeExpansion: true
---
kind: PersistentVolumeClaim
apiVersion: v1
metadata:
  namespace: minio
  name: minio-data
  labels:
    app: nginx
spec:
  storageClassName: portworx-proxy-volume-miniok8s
  accessModes:
    - ReadWriteMany
  resources:
    requests:
      storage: 2T

The above does a couple of things. First, note the ‘—‘ This is a way of combining yaml files into one file. The first section creates a new storage class that points to my nfs export. The second section creates a PVC called minio-data that we will use later. Why not just mount the nfs export to the worker node? Because I don’t know which worker node my pod will be deployed on, and I would rather not mount my minio export to every node (as well as needing to update fstab anytime I do something like this!)

Apply the manifest with:

kubectl apply -f minio-pvc.yaml

Install Minio

To install minio, we will be using helm again. We will be using a values.yaml file for the first time. Let’s get ready:

kubectl create namespace minio
helm  show values minio/minio > minio-values.yaml

The second command will write an example values file to minio-values.yaml. Take the time to read through the file, but I will show you some important lines:

32 mode: standalone
...
81 rootUser: "minioadmin"
82 rootPassword: "AwsomeSecurePassword"
...
137 persistence:
138   enabled: true
139   annotations: {}

  ## A manually managed Persistent Volume and Claim
  ## Requires persistence.enabled: true
  ## If defined, PVC must be created manually before volume will be bound
144   existingClaim: "minio-data"
...
316 users:
322   - accessKey: pxbackup
323     secretKey: MyAwesomeKey
324     policy: readwrite

Be careful copying the above as I am manually writing in the line numbers so you can find them in your values file. It is also possible to create buckets from here. There is a ton of customization that can happen with a values.yaml file, without you needing to paw through manifests. Install minio with:

helm -n minio install minio minio/minio -f minio-values.yaml

Minio should be up and running, but we don’t have a good way of getting to it. Now is the time for all of our prep work to come together. We first need to plumb a couple of networking things out.

First, configure your firewall to allow port 80 and 443 to point to the IP of any node of your cluster

Second, configure a couple of DNS entries. I use:
minio.ccrow.org – the s3 API endpoint – This should be pointed to the external IP of your router
minioconsole.lab.local – my internal DNS name to manage minio. Point this to any node in your cluster

Now for our first ingress:

kind: Ingress
apiVersion: networking.k8s.io/v1
metadata:
  name: ingress-minio
  namespace: minio
  annotations:
    cert-manager.io/cluster-issuer: letsencrypt-prod
    kubernetes.io/ingress.class: nginx
    nginx.ingress.kubernetes.io/proxy-body-size: "0"
    nginx.ingress.kubernetes.io/proxy-read-timeout: "600"
    nginx.ingress.kubernetes.io/proxy-send-timeout: "600"
spec:
  tls:
    - hosts:
        - minio.ccrow.org
      secretName: minio-tls
  rules:
    - host: minio.ccrow.org #change this to your DNS name
      http:
        paths:
          - path: /
            pathType: Prefix
            backend:
              service:
                name: minio
                port:
                  number: 9000
---
kind: Ingress
apiVersion: networking.k8s.io/v1
metadata:
  name: ingress-minioconsole
  namespace: minio
  annotations:
    cert-manager.io/cluster-issuer: selfsigned-cluster-issuer
    kubernetes.io/ingress.class: nginx

spec:
  tls:
    - hosts:
        - minioconsole.lab.local
      secretName: minioconsole-tls
  rules:
    - host: minioconsole.lab.local # change this to your DNS name
      http:
        paths:
          - path: /
            pathType: Prefix
            backend:
              service:
                name: minio-console
                port:
                  number: 9001

The above will create 2 ingresses in the minio namespace. One to point minioconsole.lab.local to the minio-console service that the helm chart created. The second to point minio.ccrow.org to the minio service.

We haven’t talked much about services, but they are a way for containers running on kubernetes to talk to each other. An ingress listens for an incoming hostname (think old webservers with virtual hosts) and routes to the appropriate service, but because of all of the work we have done before, these ingresses will automatically get certificates from let’s encrypt. Apply the above with:

kubectl apply -f minio-ingress.yaml

There are a few things that can go wrong here, and I will update this post when questions come in. At this point, it is easy to configure PX backup from the GUI to point at minio.ccrow.org:
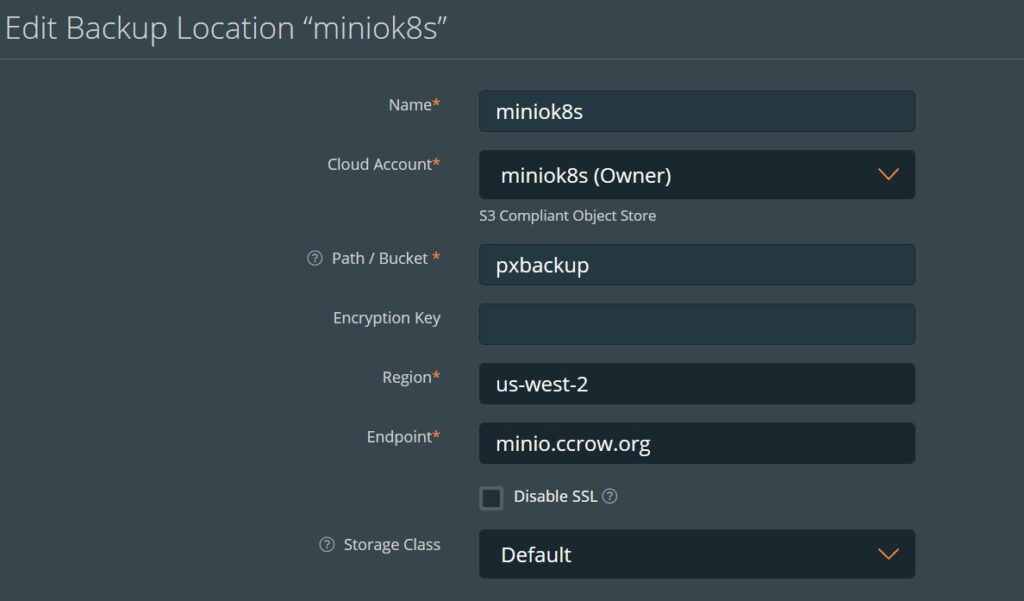
And point PX Backup at your cluster:
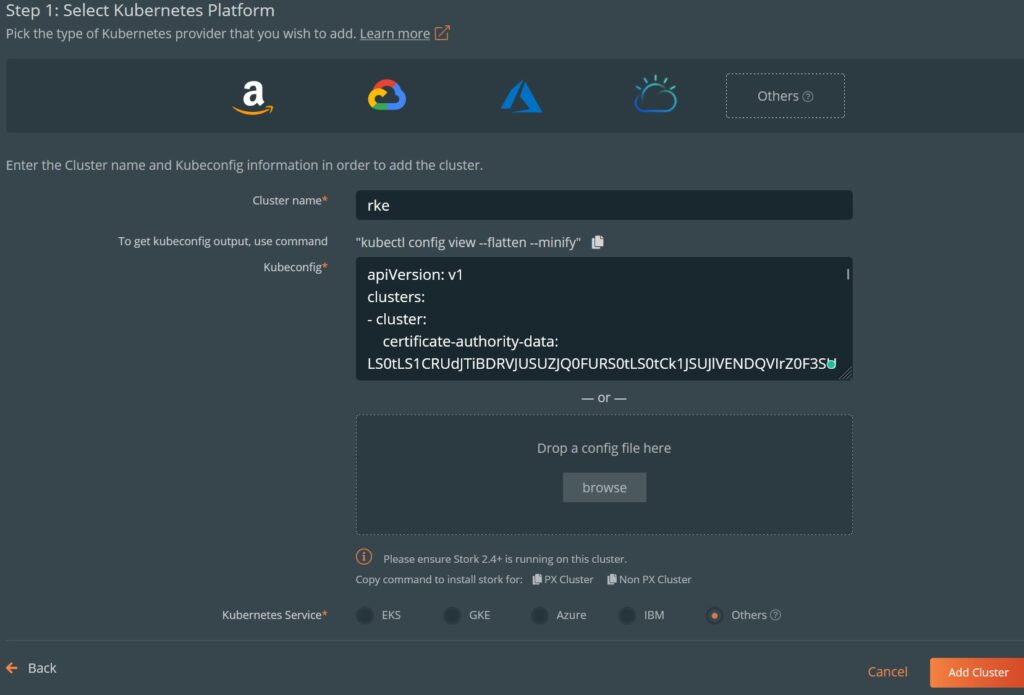
You can export your kubeconfig with the command above.

We have to click on the ‘All backups’ link (which will take a few minutes to scan), but:

Sweet, sweet backups!!!

Again, sorry for the cliff notes version of these installs, but I wanted to make sure I documented this!

And yes, I backed up this WordPress site this time…

The rest of the restore

We still have a little ways to go to get my cluster restored. My next step is going to be installing portworx. Portworx is a storage layer for Kubernetes that is software-defined, and allows for a few nice functions for stateful applications (migrations, dr, auto provisioning, etc). I’ll have more to say about that later (and full disclosure, I work for portworx). Portworx also has a essentials version that is perfect for home labs.

We can install portworx by building a spec here: https://central.portworx.com/landing/login

The above will ask you a bunch of questions, but I will document my setup by showing you my cluster provisioning manifest:

# SOURCE: https://install.portworx.com/?operator=true&mc=false&kbver=&b=true&kd=type%3Dthin%2Csize%3D32&vsp=true&vc=vcenter.lab.local&vcp=443&ds=esx2-local3&s=%22type%3Dthin%2Csize%3D42%22&c=px-cluster-e54c0601-a323-4000-8440-b0f642e866a2&stork=true&csi=true&mon=true&tel=false&st=k8s&promop=true
kind: StorageCluster
apiVersion: core.libopenstorage.org/v1
metadata:
  name: px-cluster-e54c0601-a323-4000-8440-b0f642e866a2 # you should change this value
  namespace: kube-system
  annotations:
    portworx.io/install-source: "https://install.portworx.com/?operator=true&mc=false&kbver=&b=true&kd=type%3Dthin%2Csize%3D32&vsp=true&vc=vcenter.lab.local&vcp=443&ds=esx2-local3&s=%22type%3Dthin%2Csize%3D42%22&c=px-cluster-e54c0601-a323-4000-8440-b0f642e866a2&stork=true&csi=true&mon=true&tel=false&st=k8s&promop=true"
spec:
  image: portworx/oci-monitor:2.11.1
  imagePullPolicy: Always
  kvdb:
    internal: true
  cloudStorage:
    deviceSpecs:
    - type=thin,size=42 # What size should my vsphere disks be?
    kvdbDeviceSpec: type=thin,size=32 # the kvdb is an internal key value db
  secretsProvider: k8s
  stork:
    enabled: true
    args:
      webhook-controller: "true"
  autopilot:
    enabled: true
  csi:
    enabled: true
  monitoring:
    prometheus:
      enabled: true
      exportMetrics: true
  env:
  - name: VSPHERE_INSECURE
    value: "true"
  - name: VSPHERE_USER
    valueFrom:
      secretKeyRef:
        name: px-vsphere-secret #this is the secret that contains my vcenter creds
        key: VSPHERE_USER
  - name: VSPHERE_PASSWORD
    valueFrom:
      secretKeyRef:
        name: px-vsphere-secret
        key: VSPHERE_PASSWORD
  - name: VSPHERE_VCENTER
    value: "vcenter.lab.local"
  - name: VSPHERE_VCENTER_PORT
    value: "443"
  - name: VSPHERE_DATASTORE_PREFIX
    value: "esx2-local3" #this will match esx2-local3* for provisioning
  - name: VSPHERE_INSTALL_MODE
    value: "shared"

There is a lot to unpack here, so look at the comments. It is important to understand that I will be letting portworx do the provisioning for me by talking to my vCenter server.

Before I apply the above, there are 3 things I need to do:

First, install the operator, without it, we will not have CRD of a StorageCluster:

kubectl apply -f https://install.portworx.com/?comp=pxoperator

Next, we need to get our secrets file. We need to encode the username and password is base64, so run the following:

echo '<vcenter-server-user>' | base64
echo '<vcenter-server-password>' | base64

And put the info in to the following file:

apiVersion: v1
kind: Secret
metadata:
 name: px-vsphere-secret
 namespace: kube-system
type: Opaque
data:
 VSPHERE_USER: YWRtaW5pc3RyYXRvckB2c3BoZXJlLmxvY2Fs
 VSPHERE_PASSWORD: cHgxLjMuMEZUVw==

apply the above with:

kubectl apply -f px-vsphere-secret.yaml

Lastly, we need to tell portworx not to install on the control plane nodes:

kubectl label node rke1 px/enabled=false --overwrite
kubectl label node rke2 px/enabled=false --overwrite
kubectl label node rke3 px/enabled=false --overwrite
kubectl apply -f pxcluster.yaml

The above will take a few minutes, and towards the end of the process you will see VMDKs get created and attached to your virtual machines. Of course, it is possible for portworx to use any block device that is presented to your virtual machines. See the builder URL above, or write me a comment as I’m happy to provide a tutorial.

Install PX backup

Now that portworx is installed, we will see a few additional storage classes created. We will be using px-db for our persistent storage claims. We can create a customized set of steps by visiting the URL at the beginning of this article, but the commands I used were

helm repo add portworx http://charts.portworx.io/ && helm repo update
helm install px-central portworx/px-central --namespace central --create-namespace --version 2.2.1 --set persistentStorage.enabled=true,persistentStorage.storageClassName="px-db",pxbackup.enabled=true

This will take a few minutes. When finished (we can always check with kubectl get all -n central). We should see a number of services start, but two of them should have grabbed IP addresses from our load balancer:

ccrow@ccrow-virtual-machine:~$ kubectl get svc -n central
NAME                                     TYPE           CLUSTER-IP      EXTERNAL-IP   PORT(S)               AGE
px-backup                                ClusterIP      10.43.16.171    <none>        10002/TCP,10001/TCP   6h15m
px-backup-ui                             LoadBalancer   10.43.118.195   10.0.1.92     80:32570/TCP          6h15m
px-central-ui                            LoadBalancer   10.43.50.164    10.0.1.91     80:30434/TCP          6h15m
pxc-backup-mongodb-headless              ClusterIP      None            <none>        27017/TCP             6h15m
pxcentral-apiserver                      ClusterIP      10.43.135.127   <none>        10005/TCP,10006/TCP   6h15m
pxcentral-backend                        ClusterIP      10.43.133.234   <none>        80/TCP                6h15m
pxcentral-frontend                       ClusterIP      10.43.237.87    <none>        80/TCP                6h15m
pxcentral-keycloak-headless              ClusterIP      None            <none>        80/TCP,8443/TCP       6h15m
pxcentral-keycloak-http                  ClusterIP      10.43.194.143   <none>        80/TCP,8443/TCP       6h15m
pxcentral-keycloak-postgresql            ClusterIP      10.43.163.70    <none>        5432/TCP              6h15m
pxcentral-keycloak-postgresql-headless   ClusterIP      None            <none>        5432/TCP              6h15m
pxcentral-lh-middleware                  ClusterIP      10.43.88.142    <none>        8091/TCP,8092/TCP     6h15m
pxcentral-mysql                          ClusterIP      10.43.27.2      <none>        3306/TCP              6h15m

let’s visit the px-backup UI IP address. I would do this now and set a username and password (the default credentials were printed to your console during the helm install).

The bare essentials

In my previous post, I documented my installation of RKE2 on VMware. These are mostly my cliff notes for getting some essential services.

At this point, we should have kubectl installed and connected to the cluster. We will also need to get helm installed.

sudo snap install helm --classic

Install Metallb

Metallb provides a simple load balancer. This will allow us to have external services, which is required for some of my services. The rest will be handled by ingresses (a reverse proxy). Thankfully, RKE2 comes configured with nginx as an ingress.

Install Metallb

kubectl apply -f https://raw.githubusercontent.com/metallb/metallb/v0.13.4/config/manifests/metallb-native.yaml

We will configure metallb by creating the following file:

apiVersion: metallb.io/v1beta1
kind: IPAddressPool
metadata:
  name: cheap #the name of the pool you want to use
  namespace: metallb-system
spec:
  addresses:
  - 10.0.1.91 - 10.0.1.110 # be sure to update this with the address pool for your lab
---
apiVersion: metallb.io/v1beta1
kind: L2Advertisement
metadata:
  name: example # the name of the advertisement
  namespace: metallb-system

Save and apply the file with:

kubectl apply -f config-metallb.yaml

That’s it, we have a functional load balancer.

Install and configure Cert-Manager

We are going to use helm for this installation. Helm has a few terms that it is helpful to understand:

Repository (or repo): A URL with one or more helm charts
Chart: A specific bit of software that you want to install (cert-manager in this case)
Release: A chart that has been installed
values.yaml: a values file has all of the configuration options a chart will use.

In this instance, we will not be needing a values file.

helm repo add jetstack https://charts.jetstack.io
helm repo update
helm install \
   cert-manager jetstack/cert-manager \
   --namespace cert-manager \
   --create-namespace \
   --version v1.8.2 \ # you can remove this to get the latest version
   --set installCRDs=true

That’s it! Let’s set up our certificates issuers:

apiVersion: cert-manager.io/v1
kind: ClusterIssuer
metadata:
  name: letsencrypt-prod
  namespace: cert-manager
spec:
  acme:
    # The ACME server URL
    server: https://acme-v02.api.letsencrypt.org/directory
    # Email address used for ACME registration
    email: contact@ccrow.org
    # Name of a secret used to store the ACME account private key
    privateKeySecretRef:
      name: letsencrypt-prod
    # Enable the HTTP-01 challenge provider
    solvers:
    - http01:
        ingress:
          class: nginx
 ---
apiVersion: cert-manager.io/v1
kind: ClusterIssuer
metadata:
  name: selfsigned-cluster-issuer
spec:
  selfSigned: {}

The cluster issuer allows certificate creation in any namespace. Be sure to update your email address. Apply the above with:

kubectl apply -f cert-issuers.yaml

Namespaces are important, most resources cannot use objects that are outside of their namespace. We are working with a few exceptions here, as they are cluster-wide resources.

A return of sorts

Like any good home IT shop, backups can be a struggle. Those that have visited in the past will note that there were a number of articles published. Sadly, in a fit of poor planning, I nuked my Kubernetes cluster without checking on backups. What was missing was this particular site. There is a lesson here… somewhere…

I will mention that the backups I had were Kubernetes native backups (using PX Backup). I did have VM backups, but restoring an entire cluster is a poor way to restore a Kubernetes application

I’m going to shift focus a little and start by walking people through the restoration process for this cluster, and as a way of documenting the rebuild (make a mental note: print this page).

What do we need to get an RKE2 cluster going?

Unlike more manual methods I have used in the past, RKE2 provides an easy way to get up and going and comes out of the box with a few excellent features. For those wanting to use kubeadm, I would suggest this excellent article:

https://tansanrao.com/kubernetes-ha-cluster-with-kubeadm/

For my purposes, I’m going to configure 8 ubuntu 20.04 VMs. Be sure to be comfortable using ssh. I would also recommend a workstation VM to keep configurations and to install some management tools. kubectl for example:

sudo snap install kubectl --classic

As an overview, I have the following VMs:
– lb1 – an nginx load balancer (more on that later)
– rke1 – my first control plane host
– rke2 – control plane host
– rke3 – control plane host
– rke4 – worker node
– rke5 – worker node
– rke6 – worker node
– rke7 – worker node

My goal was to get RKE2, Metallb, Minio, Portworx, PX Backup and Cert-manager running.

For those that use VMware, and have a proper template, consider this powershell snippet:

Get-OSCustomizationNicMapping -OSCustomizationSpec (Get-OSCustomizationSpec -name 'ubuntu-public') |Set-OSCustomizationNicMapping -IPmode UseStaticIP -IpAddress 10.0.1.81 -SubnetMask 255.255.255.0 -DefaultGateway 10.0.1.3
new-vm -name 'rke1' -Template (get-template -name 'ubuntu2004template') -OSCustomizationSpec (Get-OSCustomizationSpec -name 'ubuntu-public') -VMHost esx2.lab.local -datastore esx2-local3 -Location production

Installing the first host (rke1 in my case)

Create a new file under /etc/rancher/rke2 called config.yaml:

token: <YourSecretToken>
tls-san:
 - rancher.ccrow.org
 - rancher.lab.local

And run the following to install RKE2

sudo curl -sfL https://get.rke2.io |sudo  INSTALL_RKE2_CHANNEL=v1.23 sh -
###
###
sudo systemctl enable rke2-server.service
sudo systemctl start rke2-server.service

Starting the service may take a few minutes. Also, notice I’m using the v1.23 channel as I’m not ready to install 1.24 just yet.

We can get the configuration file by running the following:

sudo cat /etc/rancher/rke2/rke2.yaml

This will output a lot of info. Save it to your workstation under ~/.kube/config. This is the default location that kubectl will look for a configuration. Also, be aware that this config file contains client key data, so it should be kept confidential. We have to edit one line in the file to point to first node in the cluster:

apiVersion: v1
clusters:
- cluster:
    certificate-authority-data: *****
    server: https://127.0.0.1:6443 #Change this line to point to your first control host!
  name: default
contexts:
- context:
    cluster: default
    user: default
  name: default
current-context: default
kind: Config
preferences: {}
users:
- name: default
  user:
    client-certificate-data: ****
    client-key-data: *****

Installing the rest of the control hosts

On your second 2 hosts (rke2 and rke3 in my case). Create a new config file:

token: <yourSecretKey>
server: https://rke1.lab.local:9345 #replace with your first control host
tls-san:
 - rancher.ccrow.org
 - rancher.lab.local

And install with the following:

sudo curl -sfL https://get.rke2.io |sudo  INSTALL_RKE2_CHANNEL=v1.23 sh -
###
###
sudo systemctl enable rke2-server.service
sudo systemctl start rke2-server.service

Again, this will take a few minutes.

Installing the worker nodes

Installing the worker nodes is fairly similar to control nodes 2 and 3, but the install command and service we start are different. Create the following file:

token: <yourSecretKey>
server: https://rke1.lab.local:9345 #replace with your first control host
tls-san:
 - rancher.ccrow.org
 - rancher.lab.local

And install with:

sudo curl -sfL https://get.rke2.io |sudo  INSTALL_RKE2_CHANNEL=v1.23 INSTALL_RKE2_TYPE="agent" sh -
###
###
sudo systemctl enable rke2-agent.service
sudo systemctl start rke2-agent.service

That’s It!

Check your work with a quick ‘kubectl get nodes’

Do I really need this many nodes to run applications? No, you could install RKE2 on one host if you wanted. For this article, I wanted to document how I set up my home lab. Additionally, it is a best practice to have highly available control nodes. For my later escapades, it is also required to have 3 worker nodes because of how portworx operates.

Leave a comment with questions and I will update this post.